Wednesday, May 30, 2012

DIY Shoe Rescue


Hubby and I have been having some trouble with critters (we are not sure what they are) in our attic crawl space.   One of the biggest downsides to this problem was that I stored my shoes in that space (It opens to our bedroom).  The critters nibbled on my favorite pair of custom boots, and these shoes.


The boots were done (there was no way to save them, boo), but I thought I might be able to repair these shoes.

I went to work.


First I tore off the old weaving.  With a little start using an x-acto blade, I could basically just tear off the strips of weave.


I then had the shoes all ready for new braids to be added.

I quickly learned how to braid a five strand braid (I wanted it to be a little thicker than a three strand braid) on YouTube.


I then glued the braids to the shoes.


It was as easy as that.


I had some trouble with the edges.  It was hard to get the braid all the way to the edge, and I have to say, I burned my fingers with the super glue quite a few times.  (In fact, I still have some glue on my fingers right now.)

I think from the vantage point of a normal day no one will notice the little trouble I had.
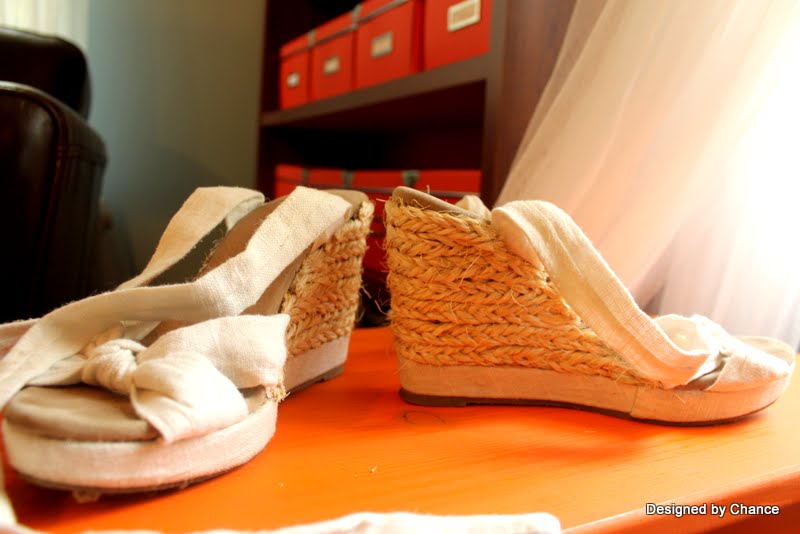
Before

After

For your enjoyment, I have given you one last before and after.  It is quite an improvement.  I can wear them now!

I can't wait to break out my favorite white and yellow dress and my "new" shoes.

What do you think?

Wednesday, May 23, 2012

Toilet Bowl Cleaner and Broken Makeup Repair


Browsing Pinterest I found two great tips: a quick way to clean the toilet and a way to repair your broken makeup compacts.

I'm not always sure if the ideas I see on Pinterest will really work so I tested these two out.

First, I will show you my messy toilet.  I have a problem with my water where there is a lot of debris (I mean A LOT, like when it rains we get chunks of stuff in our pipes).  So the toilets get pretty dirty, pretty quickly.

Here is our toilet before the "bomb." (The original post was found here)


Like I said most of this dirt is from my dirty water.

I added 1/2 cup of baking soda and 1/2 a cup of vinegar.


The toilet water will bubble up and get all foamy.  It is actually quite fun to look at.

One quick swipe with the toilet bowl brush and...


it's clean!!!!


Next...I also had a blush compact that broke right after I bough it.  It was super annoying to try to put blush on with it all in pieces.  It looked like this.  (the original tutorial is here)


As suggested on katrinalomidze.com I added some alcohol to combine the product back together.

Seeing the wet compact, I was not sure if it would work.  I had some trouble getting the surface smooth, but who needs smooth?  I'm happy with one piece and not a million.


It worked!!!


But then, THE VERY NEXT DAY... I dropped the very same compact again.  It is now back to being in a million pieces.  Guess I have to try again.  :(

Do you try ideas you have found on Pinterest?  I once saw a suggestion that there should be a "done that" box you can check off on Pinterest.  I really need that.

Friday, May 18, 2012

How to Hang a Frame


I got a new frame for 50% off and framed a print my master's professor gave me.  It is really quite a funny print.  Since it had two hooks on the back I decided to try something I saw on Pinterest (btw be sure to stop by and follow me on Pinterest HERE because I'm there too and have lots of fun original pins).

The concept is simple.  Use a strip of painter's tape to measure the difference between the two hooks, then attach to the wall.


I measured the hooks with tape.


Attach the tape to the wall where you want the frame.


Nail in the hook latches.  (It was at this point that I made a slight mistake, if you look closely you will see the the hooks are not even, making my frame slightly slanted.  I didn't catch it at the time and will have to go back and fix it another day.)

Hang your frame.


FYI the print says "Is your washroom breeding Bolsheviks?"  It is an advertisement for "Tissue towels."  I crack up every time I see it.

Tuesday, May 15, 2012

Stenciled Bathroom Wall


I stenciled my bathroom wall this week.  I have been wanting to lighten it up and make it a littlel more fun and now it is done.


I bought the stencil and just used some acrylic paint I bought a Lowes.  I first tried a large dapple brush but in the end a smaller stencil brush worked the best.


I also framed and hung up a new picture.  The print says "Is your washroom breeding Bolsheviks?"  I thought that was appropriate for a bathroom.  I also plan to incorporate a little bit more red to tie into the print.

Now I have to be real, it was not all perfect.


I messed up some spots, and had to fix some places where the stencil bled, but overall I'm very happy.

One thing I love about the stencil is the square design.  I wanted something that would tie in with the tile on the other side of the bathroom but did not overpower the other shapes in the room.


Below you will find the sink side.  I love the white tile and grey grout.

So there you have it, my newest project.  I finally stenciled the bathroom wall.  I hope to do some other little adjustments to the room and then have a final reveal.

What do you think?  Do you like stencils?  Where would you stencil a room or wall in your house?

Where I party:


DIY Show Off

Confessions of a Stay At Home Mommy


Sew Chatty

Sunday, May 13, 2012

What I Wore to an Interview


I finally had an interview (if you have been reading along you will know my troubles with being unemployed, or you can read it here).  In fact, it was a SECOND interview and I'm hoping it will turn into a third. It is for a teaching job.  I'm actually very excited about it.

So without further ado, I will show you what I wore ... but first let me warn you that I did not get a very good picture.  I was wearing all black and the only full length mirror was back-lit.  Please forgive me for the poor quality photo.  


It is a black skirt suit with a really cute little collar.  Unfortunately, you can't see the collar.


Alright this one is all blurry, but you can kind of see the collar and buttons (ok you might have to squint).

Note my hair is back and my makeup minimal.  I'm trying to look professional.

I was really nervous, I think that might be why I could not focus on a good photo.  What to do?

So ... would you hire me?  What do you wear to an interview?

Wednesday, May 9, 2012

DIY Instant Oatmeal


I love me some instant oatmeal.  It is easy, healthy and yummy.  I'm not good in the morning, I'm slow and have trouble making things (even my tea tastes weird lately, what's up with that?).  So instant oatmeal it is for me.  It is perfect because it is easy, healthy and yummy, but mostly easy.

I used to buy the stuff in the box but I stopped buying it because I hated all the packaging and the price.  Now I make my own and I don't have to worry about the packaging.

I found the recipe on Pinterest (the original source is here), changed it a little, and now I have the perfect recipe for instant oatmeal.

First we must gather our ingredients:


Find recipe:
DIY Instant Oatmeal
1/2 cup quick cooking oats
1/2 teaspoon cinnamon
2 teaspoons powdered milk
1/8 teaspoon salt
2 teaspoons brown sugar

Mix all the dry ingredients in a small zip-lock bag.... and you have one serving of instant oatmeal.


I now make about seven of these at a time.  I find it goes much faster if you do each ingredient in an assembly line fashion.  When I finish with the bag I save it and reuse it.


When you are ready to eat all you have to do is add water (I eyeball it)

wait five minutes and eat.

Yummm.  Tastes like maple sugar oatmeal.  It is so good.

So ... what are you like in the morning?

Tuesday, May 8, 2012

I'm a Guest Post-er


I totally forgot that I did a guest post last week.  I wrote a post for Stacy over at Embracing Change.

Stacy has a great blog with lots of great projects.  But most importantly you have to see my project.


I made these.  Be sure to go HERE to see the full tutorial and post.

Hope you like it.

Wednesday, May 2, 2012

What I Wore for the Wedding


I have been talking about this wedding for a long time.  I was very excited about it.  You see, I don't get to go to a lot of weddings. I was older when I went to college, so I didn't have a whole slew of friends, and my own friends are not the kind of people to have big weddings.   In fact, when I got married myself I only had attended two weddings as an adult.  Not to mention, weddings are fun and I love them.

This summer I'm making up for lost time and have two, maybe three weddings to attend.  Yipee.  I'm so excited.

So I talked about the upcoming nuptials of a dear friend of mine here, and here, and ultimately the big issue was that I did not know what to wear.

My friend gave instructions on her invitation that you were to dress "Vintage fun, and black tie (optional)."  I also have to mention that my friend is a burlesque performer (not to be confused with a stripper).  So I wanted to wear something that was going to look good and I was not too concerned with being quite sexy.  I also still adhere to the old saying that you should not wear black to a wedding (although this was just outside NYC so lots of people were in black and I could have worn black too.)

That left me with one dress that would work.  The problem was that although the dress was going to work I did not have a bra that would work with the very low neckline of said dress.  I put it to my readers as to what to do about the issue.

This was the dress with my strapless bra from my own wedding.


Notice the white bra peeking through.  Yeah that did not work.  then I tried a little black lacy thing to cover the bra and that did not work either.

Finally, I caved and bought a new bra for the occasion.    I bought a SUPER low halter bra.  I figured it could be used at other times, and it was really not too expensive (for a woman who shops at Victoria Secret anyway, ha).

It looks like this:
{source}
That is not the halter one, but you get the idea.
This bra (or one like it really) worked wonders on my thirty something body.  I was quite happy with it.

So now you get the after.

I decided to wear my hair down so that I could cover my cleavage if it all got to be too much for me (which it did and I was glad to have a little "hair shield").

I'm even wearing makeup.  I'm not sure if you can tell, but this is a lot of makeup for me (I usually can't be bothered).

That is "What I Wore for the Wedding."  The wedding was amazing also, but I didn't want to be one of those people who was walking around with a camera so I didn't get any pictures.  Trust me it was amazing. It was in a fine arts museum if that tells you anything.  For the next wedding I may just wear a black dress with some colorful accents.  I'll keep you posted.
 
Blog Design by A Mommy's Blog Design (© Copyright 2011)