Monday, July 29, 2013

Small Closet Upgarde


So many details in my house just seem wrong.  I'm not going to go into the long list of little jobs that were not completed very well, but lets just say that I am still fixing things when this house was only renovated five years ago.

One detail has been bothering me since the day I moved in: the closet in my bedroom.  First, it is tiny, but that is not anyone's fault, there just is not a lot of room in that room for a closet (it was kind of an afterthought).


But the part that kills me is that the rod for my clothes was installed from the front to the back of the closet instead of across the width.  This gave me about two-thirds less space to hang my clothes in an already small closet.  You can tell in the shot above that there is no rod or shelf across the top. The rod and shelf is off to the left just behind that wall with the heart.

The closet was also never primed or painted.  For a long time I had dreams of installing a pink damask pattern in that little closet and I know it would have looked fabulous, but after years of searching it is just not that easy to find wallpaper that is both nice and not too expensive.  If anyone has any ideas as to where I can find some nice wallpaper remnants I'm all ears.

In the end, I just painted the closet with some "oops" paint I had in the basement from my days of buying "oops" paint (the hubby discourages me from buying it anymore because we have so much paint in our basement and we need to control the clutter).  My "oops" paint was a blue exterior paint with a primer right in it. I figured that would do.  My mother-in-law, who actually did the painting because I'm pregnant and not supposed to inhale the fumes, kept asking me if the color was alright.  It's a closet.  We both figured it does not really matter because no one sees it but me (and my readers, hehe).

So we (really she) painted,  the hubby and I installed the new rod, cut to fit the right way, and we even got a nice shelf up to hold all my purses.  (It's a good thing I'm not really a huge purse and shoe person, because any more stuff would not fit.


Here is my after.  Everything is off the floor.  Clothes hanging the right way.  Even our little shelf.  I decided not to go crazy organizing the shelf.  It is just a pile of bags in bags (to protect them).

Now, a couple of tricks I have learned along the way.

1) Use all the same coat hangers!  My wonderful God mother taught me this one.  Boy was she right!  When you use all the same coat hangers, your clothes look better, the closet looks better, and life is better.  You will thank me later.  (We have been watching a lot of Monk, an old T.V. show, and he Monk, says that all the time.)


By mistake when we bought these coat hangers, which are supposed to take up less space, we got both gold and silver ones.  I try to keep the silver ones in here only, but sometimes a gold one slips in.  I love the way this looks.  My clothes may not all match like some Ikea commercial (BTW, have you seen the one where the whole closet is full of yellow clothes?  How could someone live like that?  Yellow?), but my closet does look better for a real person who wears all sorts of different clothes.

2) Hang a tie rack behind your clothes for belts and scarves.


Ok, I totally read that tip in a magazine somewhere, but they were right.  It is a brilliant way to store your unused items waiting for just the right outfit.  I'm not a huge user of accessories, but I always want to be.  So I have a pretty large selection of belts that needed a home.  I also hang my little party purse here for special occasions.


I do not hang my scarves there for the simple reason that I have too many.  After living in India for so long, I have a huge collection, and I prefer to put them where I can see them and use them a little more often.  In my baskets.  You can real all about my basket and old closet reorganization on the post Cleaning Out the Closet.

The new configuration of my little closet is so much better.  Once I'm back to a normal size I can't wait to have all my favorite dresses in there to look at and admire (if not wear, because I will have a baby).

Thursday, July 18, 2013

Yellow Wedding


An old friend of mine had a beautiful wedding a couple of weeks ago.  .

My friend decided to do her wedding in yellow and black.  The bridesmaids wore long black dresses (and one fabulous pant suit).  They looked positively fabulous beside the black tuxes of the groomsmen and under the bright white Chuppah.  It was an amazing ceremony.

I did not get any shots of the bridal party or the beautiful bride, because I don't like to wander around a wedding with my big old Cannon.  I leave the real photography to the wedding photographer, who was so sweet and kind, by the way.

I did get some great shots of the details before the wedding.


I did not capture the beauty of these flowers.  They were a soft butter color and so amazing.  The florist told me my friend had known for two years she wanted yellow roses.  It was brilliant.  The yellow really brightened the location and made it look really nice.


The favors were Grappa (I believe) that was made right on location.  The labels represent both the last names of the bride and groom.  I'm looking forward to when I can have a drink again and see how this stuff tastes.


The seating cards were a nice touch.  They used corks from the winery which the groom and wedding party carved themselves.  The cards looked great all lined up.


One choice that my friend made was that she hired many friends and vendors who are known in our home town.  I loved that the florist, baker, and judge were all friends who were also invited to the wedding.  They all did an amazing job and the personal touch was really nice.

I met the lady who made these cupcakes (she sat at my table) and she has an amazing way with baked goods.  I had the lemon cupcake and it was sooooo divine.


I really love this shot.  The light is just right, and light is what everything is about with photography.  It speaks for its self.

Here's a shot of the reception venue.


Like I said, the yellow centerpieces really brightened it up.

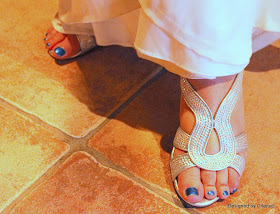
To end: I did get a shot of the bride, but only her toes.  I wanted to show off her "something blue" toenails.


 I just love the toes, and the shoes.  My friend has fabulous taste, she did go to F.I.T. after all.

Monday, July 15, 2013

Back Deck Vegetable Garden


Ok, I am coming to terms with the limitations of my own nature.  This is what I have learned: I'm not terribly organized, I don't like to clean, (but I like a clean house), and I am not good at weeding the garden.

I also like fresh vegetables and I want to grow my own.  Since I don't do weeding well, I decided to do my vegetables in pots, on my deck.  I got flowers and herbs to grow on the deck last year, so I should be able to grow some veggies.

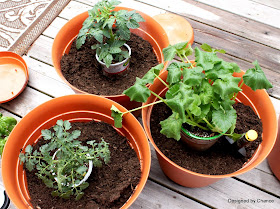
I went with some of the easier vegetables to grow.  I got tomatoes, basil, cucumbers, peppers, and zucchini.

When the hubby and I were looking for pots, we priced out quite a few.  Now, I would love to tell you that I got top-of-the-line porcelain, but the large pots like that were very expensive.  Instead, we went with, very simple, plastic pots that look like terracotta but were a quarter of the cost.


Just for perspective here is a shot with my toes, so you can see just how large the pots really are.  They need to be pretty big for the vegetables to grow (and I think my toes are cute).

Terracotta would be better because it holds the moisture and keeps the plants' roots cool.  If you can, go with terracotta.  Maybe next year we will get one or two and build up our collection.

I took the base off our pots and made them into little stands to keep the pots off the deck.  I did this because the pots were not draining well with them attached.  With any potted plants, you want to make sure the water drains well.


I lined the pots with rocks because just as important as drainage is, you have to be careful not to lose your dirt while the water drains.


I then added organic potting soil.  I'm not always crazy about my soil being organic, but because I'm growing food to eat, I want my plants to have good organic soil.  (FYI, for flowers I actually like Miracle Grow, they do a great job with flowers).


This soil has a nice combination of nutrients and whatever else soil needs.  I just think it looks good.

I decided to put a few plants in each pot.  I had to try out my groupings.


I gave the zucchini a pot all to it's self.  Those plants get big.  I then planted the little plants, gave them water, and let them so their thing.


Now, these plants have been pretty tortured by the time I got them in the soil.  A couple of days later, and they perked right up.

Here is a couple shots of the plants about a week or two after I planted them.

You can see that the zucchini above is doing very well.  Even with out being watered for a couple of days, this plant has lots of blossoms which means lots of zucchini too.


Above and bellow are my tomato and basil.  They are both doing well.  This is so exciting.  I'm kind of an urban farmer in the country.  You know, because I have a deck garden but I do actually live in the country. Maybe one day I will be up for a real vegetable garden in the ground (or maybe my big sister will come and do one for me.).  hehe


I'm really looking forward to picking my own home grown tomatoes and making a quick salad with the basil that goes with it.  Hubby is excited about his peppers, and I hope to get a least one large zucchini for zucchini fritters (if I can stop myself from eating all the flowers, hehe)